Showing posts with label how to. Show all posts

Tuesday, May 7, 2013

Using Mail Merge To Automatically Add Names to Documents, Certificates, Etc.

Mail Merge is a great tool... well the only tool, that exists in Microsoft Word that gives you the power to automatically add fields to documents that you will be printing multiple times. In business, this could include form letters, address fields, salutations, etc. In education, 9 times out of 10, we're talking about letters home or certificates.

I do a lot of certificates for the 5th graders at the end of the school year, and it gets really difficult and time consuming when you have to fill out hundreds of these things by hand. Mail merge only asks that you have their names in columns on an Excel document, and that's it. It's great.

I really hate filling out certificate after certificate, so mail merge has been a life saver. What mail merge does is it links up a field from your document (either Word or Publisher in this case) to data from an Excel document. It's fairly easy, especially once you've done it a few times.

What I have here are examples of how to do this in a few different formats.

How To Mail Merge in Microsoft Word / Publisher 97   PDF DOCUMENT

How to Mail Merge in Microsoft Word 2010 PDF DOCUMENT

How to Mail Merge Video:

Tuesday, January 22, 2013

How to Make Groups for Texting on an Android Device

In my previous post, I outlined many of the reasons it's a great idea to send daily mass text messages to your parents. If you're tired of looking back one post, it's called Some Rules for Teachers Who Text Parents or Want to Text Parents.

It's a great thing, and when you pair your Android device with a great app called Handcent SMS, you will have the ability to write a single text and send it to as many as 60 people at once.

OK, this sounds great, but there are plenty of people out there who don't know how to make groups.

It's easy, you can do it on your computer (in fact, I recommend you do it on your computer, it's much faster that way). You see, your Gmail contacts are your Androids contacts, so we're going to go into Gmail.

1.

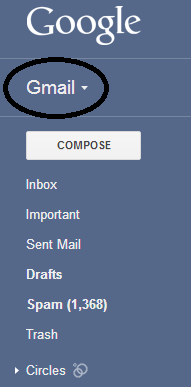
Once you're in Gmail, you'll want to click on the "Gmail" above the compose button. All of what I will show you happens in the left hand column of the Gmail layout.


2.

Now, a drop down menu will come up, click on "Contacts."


3.

On the page that comes up, look near the bottom for "New Group." Click it.


4.

You'll be prompted to name your group. Once you've done that, the page will refresh. Now, at the top of your list, you'll want to click "My Contacts" so it opens up. Your new group will be listed.


5.

Now, for this last step, I'm going to assume that you've already added all the parents to your contact list. If you don't know how to do that, let me know. That's a good idea for another "how to" post.

Now, when you open up the contact you want to add to your group, you'll be taken to the page shown to the left. Click the image of the three circles above the body (GROUPS), and click a check mark next to the group you are adding this contact to. That's it, you're done. Repeat this last step for everyone you want in your group.


Now, finally, on your Android phone, this will automatically sync. Depending upon which Droid operating system you use, you'll have a group listing in your phones address book. If you decide to use Handcent SMS, it automatically syncs the phones data to it, you don't have to do anything else.

I hope that's helpful!

Monday, July 30, 2012

Zoom Maps: A Very Simple, Very Effective Tool For Teaching Small to Large Geography or Science Relationships

I am currently working on a unit resources page about geography. In 5th grade I teach United States geography, states and capitals, and map skills, but also briefly touch on world geography. I've noticed a disturbing trend over my career. Students in the 5th grade don't often know the difference between countries, states, and continents. They have no concept of distance (they think China is next to Mexico, etc.), and think that major cities are states (countless students have called Los Angeles a state, or California a city, or thought that Los Angeles was California). I like to include this very simple activity I call Zoom Maps. All you need for this activity is a sheet of paper, and something to write with. This is obviously an activity that can be done with much younger students, but I've found success with it in both social studies and science. I do this same foldable to "zoom in" to an atom.

Check out this example I drew up. It's very crude, but it is easy to follow. I hope to upload some student examples once school starts (August 15th here in Las Cruces). CLICK HERE FOR THE PDF DOCUMENT. Enjoy!

Also, here is an animated gif of my very simple and crude example. I made this at Picasion.


picasion.com

Thursday, July 19, 2012

A Quick Tip for Teachers Wanting to Use More Technology in the Classroom

In the short history of this blog, I've already posted dozens of web based resources. There are blogs out there that quite literally have thousands of links to some great web tools. It can be a little overwhelming, because you come across these neat concepts and want to use them in the classroom. But where to start, and how to manage it all?

Today's post isn't about a web service or tool, it's about how to manage the overload that eventually ensues. I have signed up for many sites and services that I ended up not using in class. Sometimes it's as simple as the fact that the service ended up not being as free as advertised, other times I just can't make it fit a lesson, and the final (and most used) reason that I don't use some things I sign up for is I forget that I signed up for them.

I've found that it's much more useful in elementary school to not just throw a different internet based web 2.0 tool at students each day. They need time to master what's been given to them. If I'm going to teach my students how to Prezi, I'm going to give them time to learn, and I'm going to come back to it multiple times. Don't have students start a blog, then use it twice and never go back (I've done that too). In my daily internet browsing, I've come across some tools that are amazing, and immediately signed up. There's no harm in signing up and bookmarking the pages you come across. Sometimes they fit the classroom, and other times they don't.

You have to give yourself permission to still be a traditional teacher. Don't get so caught up in the technology that you go to it all the time, especially if you're not ready for that. I've been a big user of technology in the classroom since day 1, but I still teach at the whiteboard, or from books, and worksheets, when I feel it's appropriate. Trust your instincts, it's ok. Remember, kids these days aren't impressed if you use a lot of computer based technology, it's just part of daily life for them. Yes, they'll love getting to learn in new and exciting ways, but too much of it can over saturate the classroom and you'll start losing control of their learning.

My biggest recommendation is to have a balance. Find a few tools that truly work for you, and go from there. For me, it looks like this:
  • During the first week of school, I get each student set up on their own blog. I use kidblog.org for this. What I like about kidblog is the total control the teacher has.
    You can control content, commenting, and networking all within the classroom. It's secure, and comes with 500 mb of classroom space. I spend the first days giving tutorials on how to set up the blogs and customize them. I show students how to hotlink pictures and other things they wish to post (this saves tons of space, last year, by hotlinking, by the end of the year each of my 25 students had about 20 posts (over 500 total posts) and we only used 48 mb of our storage space). I'll be posting some kidblog tutorials on my blog soon to get ready for the upcoming year.
  • Next, it's time for students to learn a few web tools and how to use them, embed them into blog posts, and log in if needed. It's important to me that I revisit these tools for assignments throughout the year. Students notice if you use something twice then forget about it after you told them you wouldn't. Here are the tools that I will be introducing at the beginning of the year:
    • Prezi: In computer lab, the students at my school have been taught PowerPoint since they were in kindergarten. This is great, because PowerPoint is a great presentation tool, it's interactive, customizable, and is something kids take pride in making. By the upper grades, kids can grow a little tired of it, and frankly, I'm sick of looking at PowerPoints.
      In comes Prezi, a fantastic web based presentation tool that I have previously posted about in a post titled Prezi for Presentations: Goodbye PowerPoint! Prezi lets educators who can verify their school email address have a free educator account, but even the basic account would be sufficient for homeschooling parents. My Prezi account is set up so that my students may log in to my account and create their work there. The advantage of this is that it saves under my profile so I can view it later. Prezi comes with the option to embed as well. I'll go through a tutorial on how to make a Prezi, then have the class practice on their own.
    • Voki: I always introduce Voki early on in the school year.
      If you're unfamiliar with Voki, check out my post titled Make a Voki. Voki is great in that a single "voki" can be made without an account, and can be embedded into the students blog. They love making these fun little interactive baseball cards as I call them. 
    • PicMonkey: PicMonkey is a great tool for organizing and showing images. I did a post about this tool titled PicMonkey: Awesome Image Collage Tool.
      There is no account required to use the service, and the images you construct there are savable as jpegs, so you can take the images with you without embedding them. I use this tool all year, so I like to teach it from the start.
  • Now that students have some tools under their belt, they can practice getting more content into their blogs, commenting, etc. From there, I can grow my list of resources, and teach them more. But it is important that they have time to mess around with a new tool, to practice and master each one at their own pace. It takes time, so be patient with them, and yourself.